Mastering the Art of Black Photo Editing in Lightroom

In the realm of photography, black photo editing stands out as a powerful method to create striking, dramatic images. Adobe Lightroom, a preferred tool among photographers, offers a plethora of features to perfect this technique. Whether you’re a novice or a seasoned pro, understanding the nuances of black photo editing in Lightroom can significantly enhance your photographic artistry.
Understanding Black Photo Editing
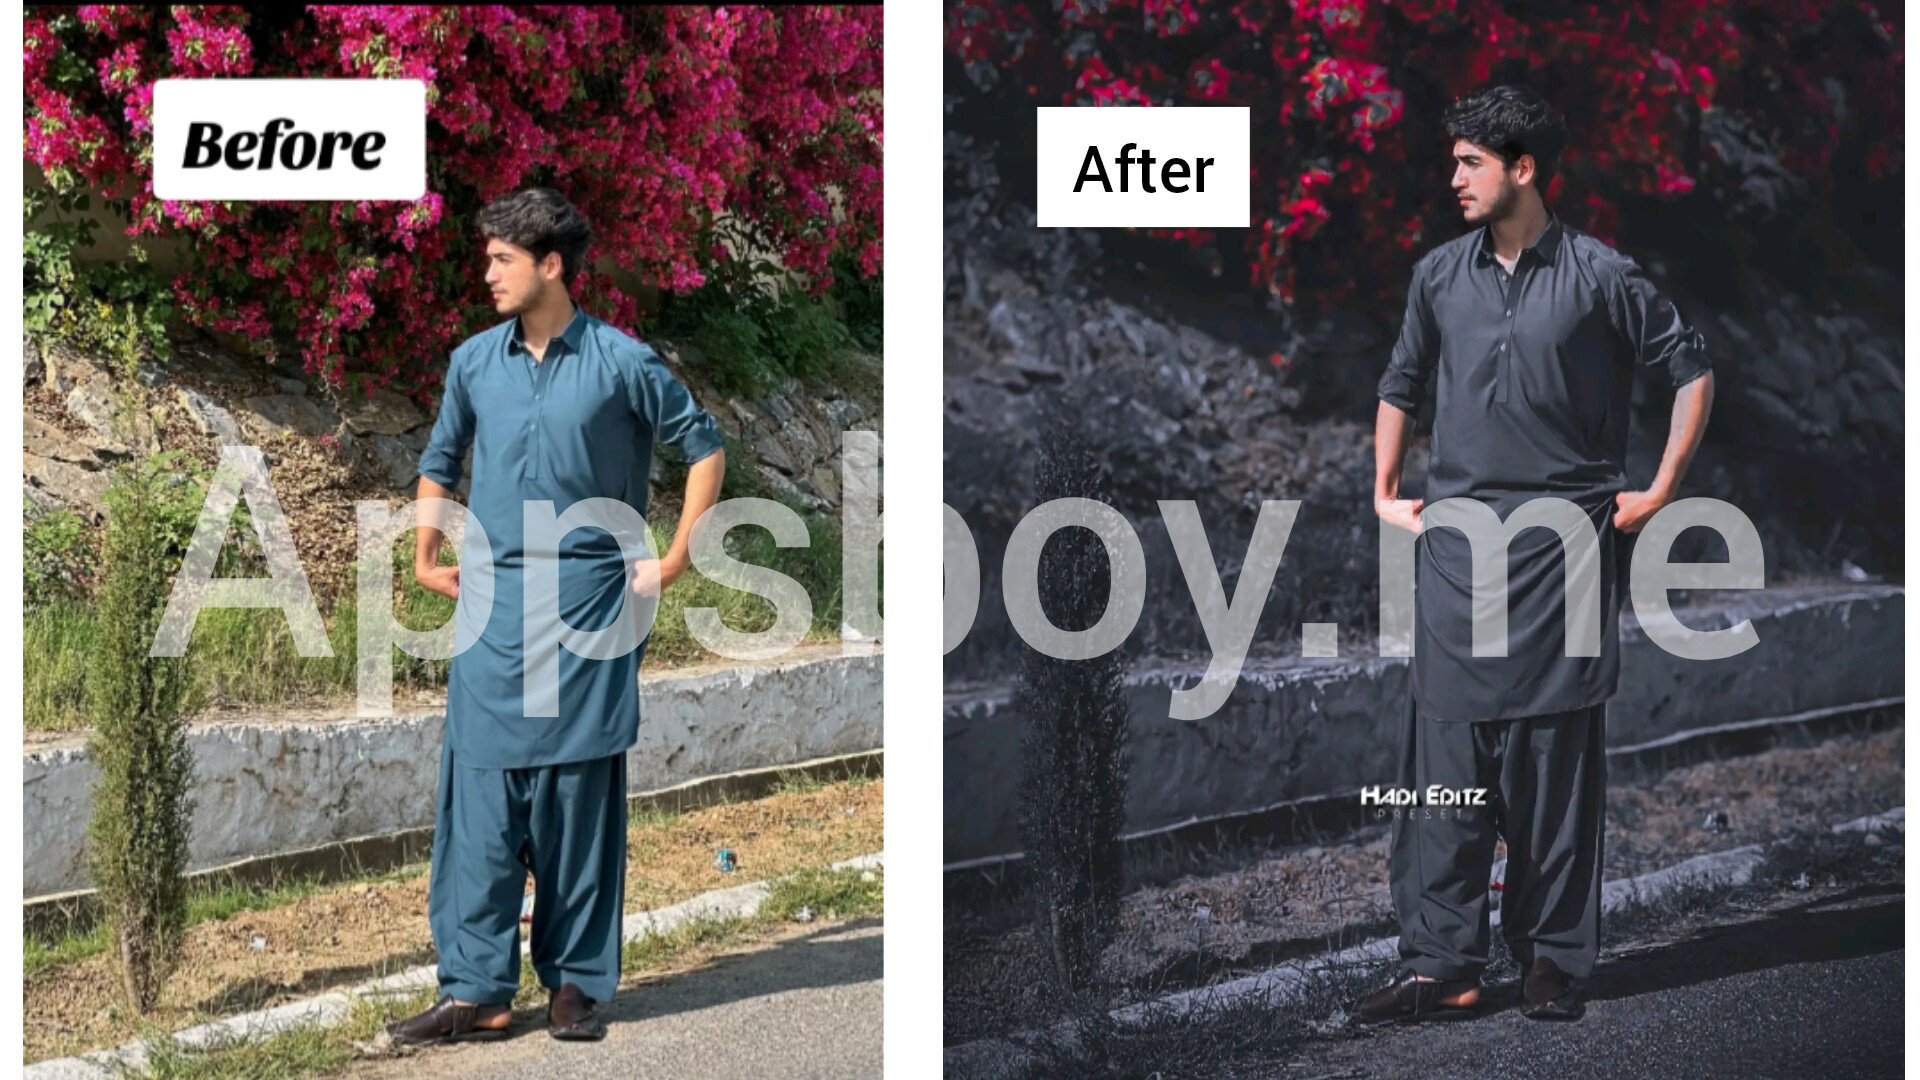
Black photo editing involves accentuating the darker aspects of an image to create depth, contrast, and emotion. Unlike black and white photography, which removes color entirely, black photo editing focuses on amplifying shadows, deepening blacks, and refining textures to make the photo’s subject stand out.
Key Features in Lightroom for Black Photo Editing
- Basic Adjustments:
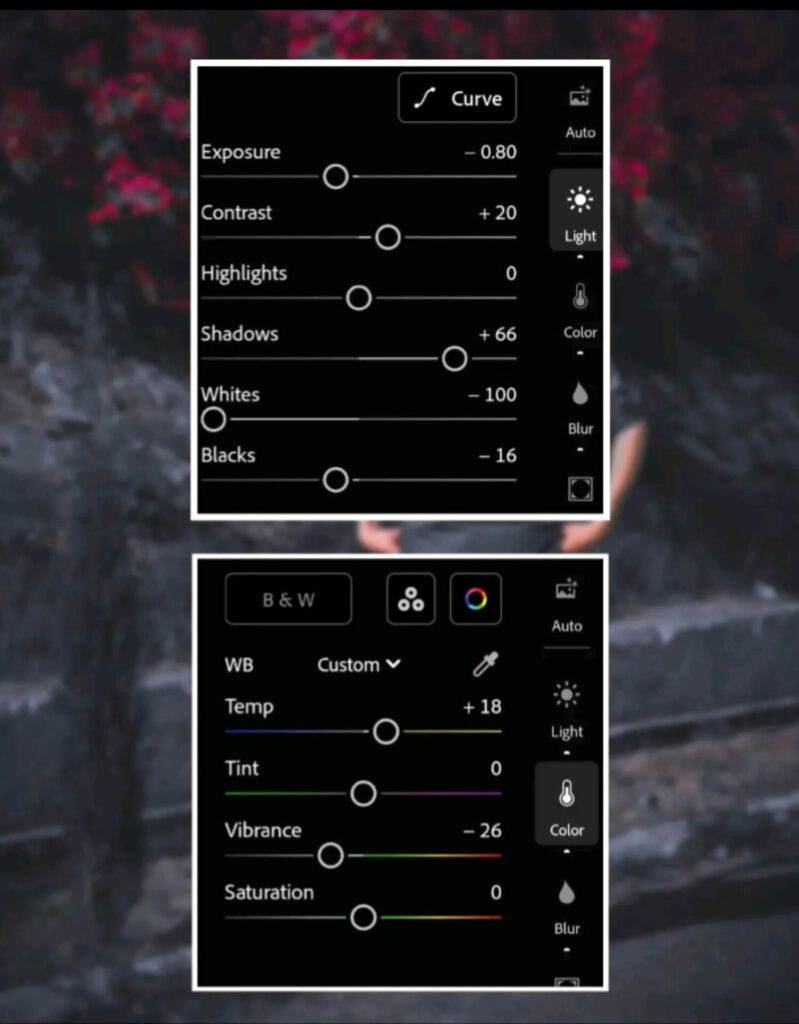
- Exposure: Adjusting exposure is the first step. Lowering the exposure can darken the overall image, creating a base for further black photo editing.
- Contrast: Increasing contrast helps in defining the edges and making the subject pop against a darker background.
- Tone Curve:
- The tone curve is essential for precise control over the shadows, midtones, and highlights. For black photo editing, focusing on the lower end of the curve (shadows) helps in enhancing the darker areas without losing detail.
- Black & White Mix:
- Even though you are not converting the image to black and white, the Black & White Mix panel can be useful. Adjusting the luminance of individual colors helps in controlling how different tones appear in the final edit.
- Detail Panel:
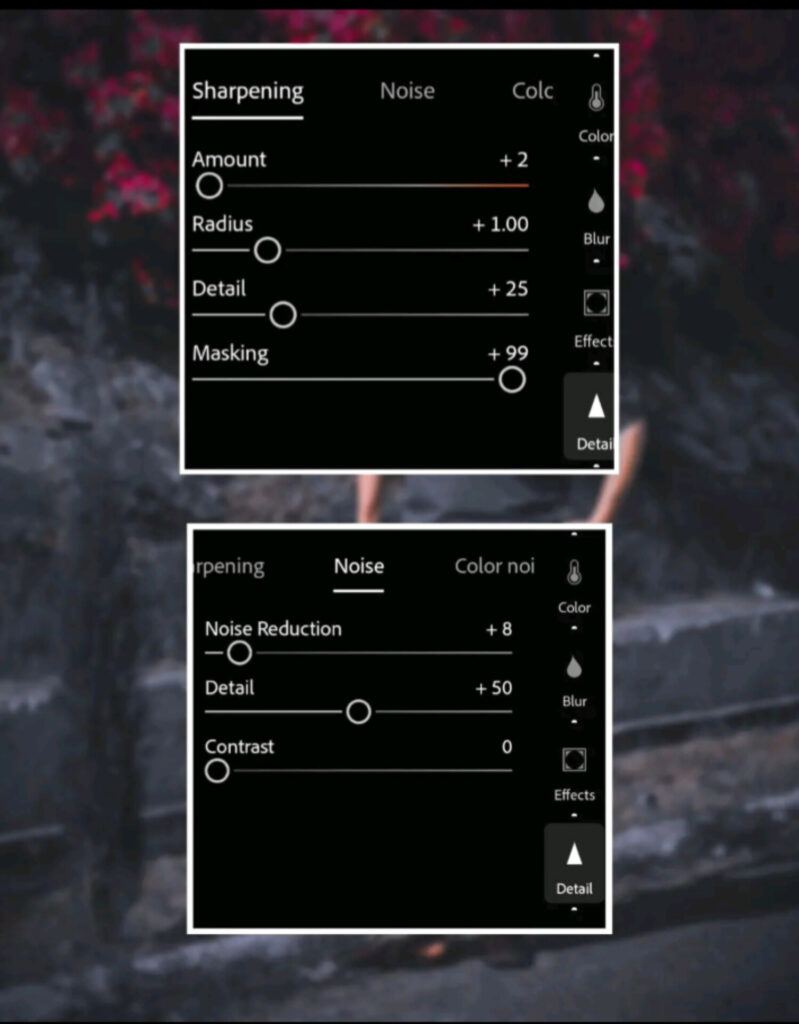
- Sharpening: Enhancing the details is crucial in black photo editing. Increasing the sharpness can help in highlighting textures and fine details.
- Noise Reduction: Darker images can introduce noise. Balancing sharpening with noise reduction ensures a clean, detailed image.
- Graduated and Radial Filters:
- These filters are perfect for adding localized adjustments. For instance, you can use a graduated filter to darken a sky or a radial filter to spotlight a subject.
Step-by-Step Guide to Black Photo Editing
- Import and Initial Adjustments:
- Start by importing your image into Lightroom. Begin with basic adjustments like lowering the exposure and increasing the contrast to get a rough dark look.
- Fine-Tuning the Tone Curve:
- Navigate to the Tone Curve panel. Create an S-curve by dragging down the shadows and slightly raising the highlights. This enhances contrast and deepens blacks.
- Adjusting Shadows and Blacks:
- In the Basic panel, decrease the Shadows and Blacks sliders. Be cautious not to lose too much detail in the shadows.
- Enhancing Details:
- Move to the Detail panel. Increase the Sharpening slider to bring out textures. Use noise reduction to smooth out any grain introduced by darkening the image.
- Local Adjustments:
- Use graduated and radial filters to make selective adjustments. Darken specific areas to draw attention to the subject, creating a dramatic effect.
- Final Touches:
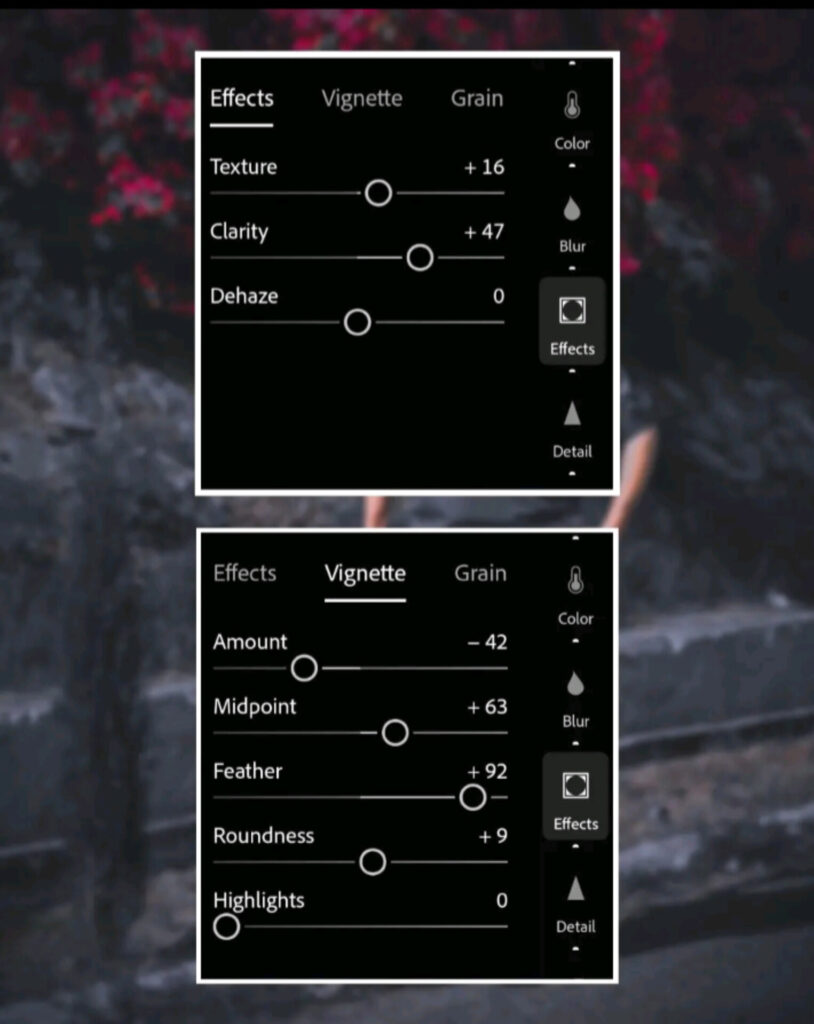
- Make any final tweaks to exposure, contrast, and clarity. Ensure the overall composition is balanced, and the subject is prominently featured.
Tips for Effective Black Photo Editing
- Shoot in RAW: RAW files retain more information, providing greater flexibility in post-processing.
- Pay Attention to Lighting: Good lighting is crucial. Backlighting or side lighting can create beautiful shadows and depth.
- Experiment: Don’t hesitate to try different settings. Each photo is unique and may require distinct adjustments.
Why People Use Lightroom for Black Photo Editing
In the digital age of photography, post-processing has become an integral part of creating stunning images. Among the myriad of tools available, Adobe Lightroom stands out for its robust features and user-friendly interface. A particularly popular technique among photographers is black photo editing, which emphasizes the darker aspects of an image to enhance its mood and depth. But why do people prefer Lightroom for this specific type of editing? Let’s explore the reasons behind the popularity of Lightroom and the allure of black photo editing.
Comprehensive and Intuitive Interface
Lightroom is renowned for its comprehensive yet intuitive interface, which makes it accessible to both beginners and professionals. The organized layout allows photographers to seamlessly navigate through various panels and tools, making the process of black photo editing straightforward and efficient. The ability to see immediate changes through real-time previews further enhances the editing experience, allowing photographers to make precise adjustments with confidence.
Non-Destructive Editing
One of the standout features of Lightroom is its non-destructive editing capability. This means that any adjustments made during black photo editing do not alter the original image file. Instead, Lightroom saves the edits as metadata, which can be revisited or modified at any time. This flexibility is particularly valuable when experimenting with different levels of exposure, contrast, and shadow adjustments inherent in black photo editing.
Powerful Adjustment Tools
Lightroom offers a suite of powerful tools tailored for black photo editing:
- Basic Adjustments: Simple sliders for exposure, contrast, highlights, shadows, whites, and blacks allow for quick and effective changes to the overall tone of the image.
- Tone Curve: This tool provides fine control over the tonal range, enabling precise manipulation of shadows and highlights essential for enhancing dark areas.
- Detail Enhancement: The sharpening and noise reduction tools in Lightroom ensure that even the darkest parts of an image retain clarity and detail without unwanted graininess.
Advanced Local Adjustments
Beyond global adjustments, Lightroom excels in offering advanced local adjustment tools. Graduated filters, radial filters, and the adjustment brush allow for targeted edits. For black photo editing, these tools can be used to selectively darken backgrounds, spotlight subjects, and add nuanced contrasts, bringing a professional touch to the final image.
Integration with Photoshop
Lightroom’s seamless integration with Adobe Photoshop is another reason photographers favor it for black photo editing. While Lightroom handles bulk editing and adjustments with ease, Photoshop can be used for more intricate edits. This synergy allows for a smooth workflow, combining the strengths of both programs to achieve the desired effect.
Creative Expression through Black Photo Editing
Black photo editing is more than just a technique; it is a means of creative expression. By focusing on the darker aspects of an image, photographers can evoke emotions, create dramatic effects, and highlight contrasts. This style can transform a simple photograph into a compelling piece of art, drawing viewers into the scene with its depth and intensity.
The Emotional Impact
The human eye is naturally drawn to contrasts, and black photo editing leverages this by emphasizing the interplay between light and shadow. This technique can add a sense of mystery, intrigue, and elegance to an image. Whether capturing the serene beauty of a landscape at dusk or the intense expression of a portrait, black photo editing helps convey a story that resonates with viewers on an emotional level.
Conclusion
Adobe Lightroom has cemented its place as a preferred tool for photographers, particularly for those specializing in black photo editing. Its user-friendly interface, powerful adjustment tools, and non-destructive editing capabilities make it an ideal choice for enhancing the dark elements of a photo. Black photo editing itself offers a unique avenue for creative expression, allowing photographers to produce evocative and visually stunning images. By mastering Lightroom’s features, photographers can unlock the full potential of their art, creating compelling visuals that captivate and inspire.


